If you have a special someone that is a Sound snob Connoisseur (you know what I mean, or you are this person) they will fight tooth and nail to have multiple speakers put throughout the living room. If you would like to support that person and their elite ears, this is a great and easy hack to hide some of the speakers.
Got speakers to hide and places to be? Skip to the instructions.

We live in an apartment, so putting speakers into the ceiling/walls to achieve hidden surround sound isn’t happening. Plus, Derek has huge bulky speakers that are silver, shiny, and stick out about 6 inches (~15cm) from the wall and I ain’t replacing them for something smaller and more expensive (I got pillows I want to spend that kinda money on). We recently redecorated our living room (post about that coming soon). Of course, since we were moving things around we had to have another conversation about where the speakers would end up. I was ready to toss them off the balcony, and Derek was ready to push me off after them. Then I had an a-ha moment and thought I was a little genius for like a day and a half.
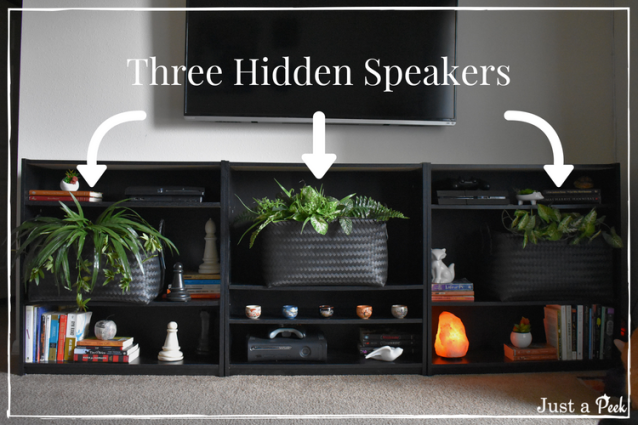
I decided since we were adding three bookcases as a credenza of sorts under the TV, that if we got baskets, we could hide the speakers in those and not lose out on any sound. This sounded like enough of a compromise to Derek and he agreed to only keep the front right, front left, and center speaker. We had 7 speakers and a sub for our 700 ft² apartment… 🙄 (now can you see why I wanted to throw the suckers off the balcony?). Plus, Derek agreed with me that it was cheapening the room and thought it was time to get rid of some of the sound power.
We have rather large front speakers, so we had to purchase rather large baskets. If you have smaller speakers you should have an easier time finding the right thing. Plus, I didn’t want wood baskets (I wanted black to match the shelves). With my limitations I still found baskets, so I’m sure you will too.
Tips
How to pick out good fake plants:
Determine how much room you have to work with from the top of your basket to the shelf above the basket. If you have little room (like the sides of our bookcase) I would suggest a hanging plant (pictured below, left) or a small vining plant (pictured below, right).
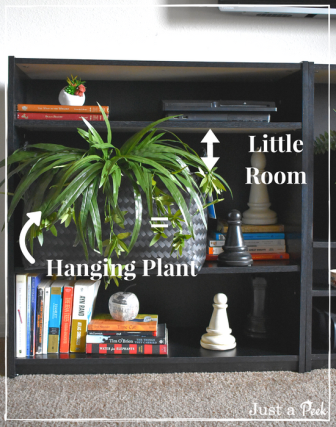

If you have more room (pictured below) I would recommend an arrangement that poofs out more toward the top that has various plant types. This will help fill the large gap with more interesting textures and be more of a “centerpiece” in the design. Our center plant was a prebuilt arrangement (I listed the plants we used below). You may need to get a bit of filler plant to make the baskets full so that when you are standing near the shelf and look down you don’t just see the stems of the fake plants or the stereo (this is also what the cardboard is for, later). Our baskets and plants filled the open area nicely so I didn’t add any filler plant, your call.

I would strongly recommend going to a craft store to select the most realistic fake plants you can. I picked my plants because they were all a similar shade of green and they all had white details (in the veining of the leaves some fake plants are white some are yellow, try not to mix the two). Our shelves aren’t very symmetrically decorated or spaced, so I opted to have a different arrangement of plants for each basket. If you have a very symmetrical setup, having all the same fake plant may add to the symmetry, your choice.
Picking plants that come to one large stem/pick makes it easier to chuck the stem into the basket and then arrange the plant to stick out the front of the basket (left and center are like this) If you have a vining plant (right) it can be a bit harder to finesse the plants into the basket and make it look natural, but after a bit of work, you can make it come together. Other fake plants that would be great for this are flowers, ferns, and grass depending on the set-up.
Plants I Used:
Left – Hanging Spider Plant
Center – Assorted Greenery
Right – Vining Plant (this one is close, but not the same as mine)
What color of spray paint/foam core to use:
After picking out your baskets, you can choose to use a black/dark brown spray paint on cardboard or use colored foam core to give the basket the appearance of being filled with dirt (or just to make sure no one can see the shiny silver speakers sitting in the baskets). You can also choose to spray paint cardboard/get foam core to match your basket (say you have a yellow basket, use yellow spray paint or foam core). I would suggest getting black as it will be easy to give the illusion of just being dark where the speaker would be, but you do you.
DIY Instructions
*I would recommend reading the Tips section above and all of the instructions before beginning*
Materials:
- Baskets that are a bit larger than your speakers (i.e. add an inch (~2.5 cm) to all measurements to fit the speaker comfortably)
- Cardboard or foam core
- Plants for each basket/speaker
- Black spray paint if using cardboard
- Exacto blade or scissors to cut cardboard/foam core
- Sound Connoisseur’s approval
Instructions:
- Determine where to place baskets/speakers. If you already have a bookcase/credenza/shelves that the speakers fit comfortably on, great. Measure your shelf size (height, width, depth) so that you don’t accidentally get too big of a basket, make a note of these measurements somewhere (like on your phone). Also, this hack isn’t just for front speakers. If you have a shelf of some sort running behind your couch and have enough room to place your speakers on there, this hack could hide your back speakers as well.
- Measure speakers. Measure the height, width, and depth of your speakers and make a note of it. You’ll want to get a basket that gives you a bit of wiggle room that way you aren’t shoving the speakers into too small of an area. When looking at baskets be aware that if they curve at the bottom you’ll probably want more room so that the straight edge of the speaker can rest flat on the bottom of the basket.
- Start looking for baskets online or in store. I had trouble finding baskets to fit our speakers, but after googling “black basket 17 in” I found my baskets here. 17″ wide was the hardest of the measurements to find in a black basket and without it being too tall for the shelf, so that’s why I finally googled it. You can always purchase one basket, try it out, and take it back if it doesn’t work or bring the darn speaker with you and go around shoving it into baskets as you please.
- Test it. After you select your baskets, be sure to test them out on the shelf with the speakers inside. You can disconnect the wires (maybe get Sound Connoisseur to help so you can’t get blamed for anything) and just test to see if the speakers will fit (don’t worry about the wires right now).
- Get fake plants. After making sure everything will fit nicely, pick out your fake plants. See my tip above for picking out fake plants. After getting the fake plants, test them out in each basket with the speakers inside and the basket on the shelf just to be extra sure everything will work nicely.
- Prepare the cardboard/foam core. After selecting and testing out your fake plants in the baskets, trace around the top of each basket onto a piece of cardboard or foam core. Cut out your cardboard/foam core following the lines you traced. Place the cardboard/foam core inside the baskets to make sure they fit easily and can rest on the speaker comfortably (this will be to hide the speakers so someone doesn’t see the shiny speakers underneath the fake plants). If you are using cardboard, spray paint it the color of your choice and allow to dry (see my tip above). If you are using foam core, it should already be the color you chose, so no need to color it in any way.
- Wire. Place the speakers in the baskets and find a hole in between the woven pieces of your basket (see below) or simply let the wire come out the top of your basket. If your shelf has a removable back that is tacked in place with nails, take a nail out that is close to where the basket will sit, and push the wire through the small opening to run the wire behind the bookcase and up to your receiver (again, get the Sound Connoisseur’s help). If you have a solid back that isn’t removable, either find an area to fish the wire through to the back or make a small hole to feed the wire through using a Dremel or similar tool. Test the speakers before moving on.


- Assemble. After the speakers are all up and running, place your cardboard/foam core piece into the basket, then arrange your fake plant in the basket. If you are having trouble fitting the thick stem that holds your plant together into the basket, you can either try to cut the end off using heavy duty wire cutters or cut a small hole in your cardboard that the stem can go into. Enjoy your “speaker free” environment!
Hopefully this DIY was useful to you, and as always, if you have any questions feel free to comment below and I will get back to you within the hour (usually).
For more DIY’s, check out my DIY Blackout Candles for the best way to be prepared in case of a blackout.
*I am not affiliated with any of the links or companies used in this post*


Hi @KittenAroundtheKitchen, After living with the disguised speakers for a while, does your Sound Connoisseur approve? I have 3 speakers on a ledge above my TV that I would like to disguise and incorporate into the decor as well. Thanks!
LikeLiked by 1 person
Hello! Thank you for your comment!
The Sound Connoisseur does approve and we even incorporated the idea into another room of ours. We never noticed a difference in sound after the project, so I would say it was a success!
The biggest thing is that the speakers need to be in/decorated with something that will allow sound to escape. So things with holes/gaps and nothing too tight fitting around the speakers. Also, I love how it looks even to this day (probably my favorite area in the living room) 🙂
I hope your project goes well and you have a great week!
LikeLike