This how-to is mostly focused on food and small product photography backdrops and floordrops, but that doesn’t mean these can’t be scaled up for larger photography. This is probably one of my absolute favorite photography hacks because it is easy, cheap, and makes my food photos look pro.
Check out 10 Tips for Better Food Photos for more photography info!
I think I love this hack so much because it was my own brainchild and I felt so proud of my little creation. However, after a quick google search it appears I was not the first to come up with this, oh well, I still love it! This hack is amazing because it allows you to pick backdrops and floordrops that go the best with the food you are photographing. I love having a variety that I can choose from to really make everything look its best.
Backdrops:
For easy, lightweight, storable backdrops I like to use foam core and poster board. They come in a variety of colors and are easy to hold in place with a heavy object. They can be found for cheap at Walmart and dollar stores and you can find more colors for a higher price at hobby/craft stores (don’t forget to use a 40% off coupon)! I think the most usable colors are white, light grey, black, navy blue, baby blue, and baby/blush pink. These would be my first colors to get in this order (white being the most essential).


Above from left to right, I used gray, blue, and black foam core, respectively.
You can also decorate the foam core/posterboard with scrapbook paper or acrylic paint in patterns such as polka dots, triangles, stripes, etc. Or just get creative! When choosing what colors to decorate your backdrop, I would focus on neutrals or different shades of the same color (i.e. you have a baby pink board and glue on a darker pink scrapbook paper shapes). I use all of mine plain, but I might change that soon.
Psst… Most foam core is white on the back so you can get a color and white all in one foam core board!
How to Use:
I like to use my foam core by themselves, they are sturdy enough to hold themselves up with a heavy object positioned behind them. The posterboard is more flimsy and needs some more structure, so I just use a piece of foam core behind them to help hold them up.
I usually use a small heavy object behind the foam core/poster board and just slightly angle the top of the foam core/posterboard toward the object so it will hold on its own and not fall (although if you have cats, I guarantee the little demons will knock them over eventually).
Also, it is important to know that the oil on your hands can sometimes mark up the foam core (I don’t notice it as much on the posterboard), so make sure you use clean hands to handle the foam core and try only touching it on the edges.
Floordrops:
What I mean by floordrops is the kind of ‘tabletop’ you’ll be displaying your food on. In the picture below the floordrop is the white and grey marble and the backdrop is the blue.

This is from the Classic Mudslide Milkshake Recipe.
I make floordrops by purchasing individual pieces of flooring from Lowe’s and Home Depot (I haven’t found any other stores that sell individual pieces). Not all Hardly any flooring is sold individually, so make sure the pieces you are looking to get are marked “$x.xx per piece” and not “$x.xx per square foot”. Often times after “per square foot” you’ll see “per carton” meaning you have to buy one whole carton/multiple pieces at once which usually is $50 and not at all what I recommend. Usually, all vinyl and most peel and stick flooring are priced per piece which is nice because they are the easiest to work with and are lightweight. I have a few that are faux wood made out of tile that were a bit more expensive and difficult to use, but I really wanted wood in that color and couldn’t find it in vinyl.
When picking out flooring, you got to be careful. I usually pick faux wood or marble because these things look like a tabletop or countertop. Most of the flooring is very tile-y looking and will look like your food is sitting on the floor, not appetizing. So whenever picking out flooring carefully look at it and think “does this look like a tabletop/countertop, or floors I would put in the bathroom?” if it’s the latter, ditch ’em.
The Flooring I Use:
So far, I have the following flooring as floordrops:
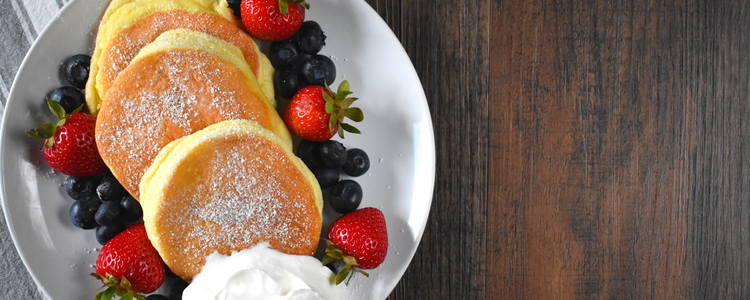
This is from Fluffy Japanese Souffle Pancakes (Recipe). I use this wood vinyl and mostly use it for more sultry dishes like coffees and hearty food.

I use this marble peel and stick for images I want to be bright and light like healthy dishes or dishes with light flavors. However, the pieces are a little small for a floordrop and have a very obvious line down the middle so I would recommend marbled contact paper instead.
I also just picked up these wood-look tiles and haven’t broken them in yet.
We also have a light-colored wood table top that I use sometimes.
My most recommended floordrop would be the wood flooring from the very first picture and white and grey marble contact paper, these two will get you pretty far.
What’s great about vinyl is you can cut it up with some heavy-duty scissors and create a pattern. You could create the popular herringbone pattern, recreate a table top you like, or just position them next to each other in one line (this is what I usually do, but I want to try herringbone in the future).
How to Pick Out Pieces
When picking out individual pieces of vinyl flooring I like to lay out the pieces on the floor of the store and pick out ones that look best together. I first like to make sure I’m not getting repeat pieces (two of the same exact piece) and that all of them are similar shades. In a whole box of flooring, there can be several different colors going on. For example, in the picture below, there were some pieces that had darker wood grain than others. I preferred the ones with less of the darker wood grain and looked for pieces that were generally lighter. Basically, you’ll come across pieces that don’t look that good together since it’s not a whole kitchen-full of the flooring and just a few pieces, because of this it is important to pick pieces that are similar colors and look like they go together. Once I find something I like I snap a picture so I can arrange them the same way when I get home.

How to Setup Vinyl
The best thing about vinyl and other peel and stick flooring is that you can, well, peel and stick. Here’s how to create a storable floordrop with peel and stick:
- Start with a piece of cardboard that is larger than all of the flooring pieces laid out how you would like the finished product to look. Wipe the cardboard down with a very damp paper towel to remove any dust or dirt.
- Take all the pieces and draw on the outer edge with a black sharpie (the edge the grout would go into). The pieces aren’t going to be perfectly flush, so this helps create a natural looking gap that most wood would have. I wouldn’t recommend the sharpie trick with light colored flooring like white marble or with non-wood flooring.
- Peel off the first piece and carefully stick it on straight as possible slightly in from the edge, it can be hard to get on the very edge perfectly straight (this is where having a cardboard piece larger than you need comes in handy).
- Once the first piece is in place, peel off the next piece and butt it up against the first one as close as you can. I like to do this by sliding the piece on its edge (one you sharpie-d) at an angle until it is tight against the first piece (may want to hold the first piece in place to prevent sliding), and then lay the piece down. I continue to do this until all pieces are in place.
- Once you have placed all the pieces, rub all of them to make sure they are thoroughly stuck. I like to stand on mine to make sure the pieces are really stuck.
- Take an Exacto knife and go against the edge of the flooring to trim it to size (use another piece of cardboard underneath so you don’t cut whatever you’re working on).
- Leave the finished piece laying down overnight to ensure the adhesive and cardboard are thoroughly stuck to each other.
Tips: Once you have a piece stuck down try not to pick it back up unless it’s absolutely ruined, it will most likely never stick quite right and will fall off continuously. You can store this on its side in a closet or between furniture or laying flat under a bed.
And that’s it!
Tile Floordrops
Now, if you’re like me and fell in love with some tile pieces, then I recommend getting a piece of wood the size of all your pieces placed together. This is because I like to store my pieces stacked and off to the side instead of stuck to something (they are very heavy and I don’t think would stick well to things and store well). The wood allows you to protect the surface you are putting your floordrop on (tabletop) and allows you to move the pieces around easier than cardboard would. I don’t stick them together, instead, I have them numbered 1-4 on the back and stack them that way when storing. I will place the wood down and unstack the pieces, squeeze them together and get shooting. For me, there was no easy way to get them attached to something and they are very heavy, it seemed impractical.
Wood Floordrops
If you want to make your own wood floordrop, you can buy some cheap pine, spruce, or poplar planks, cut them with a miter box to the length you want, stain any color you want, and then stick them together with some wood glue (try not to get any wood glue on the top side). You want to pick a stain that is an all in one stain and sealer or make sure you seal your wood, that way if you accidentally spill you can easily clean it off without damaging the wood.
Contact Paper Floordrops
You can also make floordrops from contact paper (this would be good for marble patterns). You could get a large piece of cheap wood and contact paper that, or just roll out the contact paper and use it as is and roll it back up when done (may have a bend that is annoying).
What About Other Materials?
The reason I like to use flooring and contact paper is that they are meant to be cleanable. If I accidentally get something on them (or intentionally like in the gif below), I know I can easily wipe it up no problemo.

Check out 10 Tips for Better Food Photos for more photography info!
Thank you so much for reading, I hope this helped you up your food/product photography game. If you use this, be sure to share with me your creations in the comments below, on Instagram (@MollyKamper), or Twitter (@MollyKamper).
Like this post if you would like more photography tips, tricks, and hacks! I do tend to create more of the things that have the most likes. Let me know in the comments below if you have any other tips or tricks you would like me to try or share!
Have a great week!


Interesting suggestions, nice pics too 🙂 Thanks for sharing!
LikeLiked by 1 person
Thanks! Glad you enjoyed it!
LikeLiked by 1 person
You’re very welcome, of course I did 🙂
LikeLiked by 1 person
This post was very educational. I love it. Thanks for sharing those tips.
LikeLiked by 1 person
Glad you got something useful out of it! Thanks for stopping by! 😊
LikeLike
Yes, I did. I’ve been wanting to create more backdrops, and after reading this, my inspiration and motivation rose again. I’ll definitely be stopping by more often. I followed your blog.
LikeLiked by 1 person
Well, glad to hear it! Hopefully there will be more photography and blog related posts in the future. Thanks for the follow!
LikeLiked by 1 person